Thursday, December 31, 2009

Preppy memories


I'm ringing out 2009 by sharing this super-feminine card. I just love how it turned out! The color combo is reminiscent of the preppy 80s. Pink and green was a great color combo back then
and is still one of my favorites! To soften the card, I used the cutter kit to distress the edges of some of the layers. And the card features some of the new products coming out next month in the Occasions Mini Catalog: Vintage Vogue clear-mount stamp set, Perfect Polka Dots textured impressions folder for the Big Shot, and gorgeous new satin ribbon (it comes in 9 colors!). Hope you like it!

Thanks for stopping by and I'll see you in the New Year!

~~Marilyn~~

Stamps: Vintage Vogue
Cardstock: Certainly Celery, Pretty in Pink, Whisper White
Ink: Certainly Celery, Regal Rose
Accessories: Big Shot, Perfect Polka Dots embossing folder, Pretty in Pink satin ribbon, cutter kit, stampin' dimensionals

Monday, December 28, 2009

Upcoming Promotion

Beginning on January 5th with the release of the Occasions Mini Catalog, Stampin' Up has partnered with Country Living magazine to present the Cards a la Carte kit (item 119113) that offers versatility, quality, and value.

The kit includes:
  • Dinner Party stamp set (3 stamps)
  • Ballet Blue Classic Stampin' Spot
  • Preprinted stationery (24 sheets: 4 each of 6 designs)
While the kit was designed to create stationery, there are a variety of ways it can be used--greeting cards, menu cards, dinner invitations, and more. Here are a few examples of other projects that can be created with the kit.

A dinner invitation:
A Mr. & Mrs. card collection:
Remember, the kit is available for purchase starting on January 5th, so call or email me to get yours!

Saturday, December 26, 2009

Temptation


Sale-a-Bration and the new Occasions Mini Catalog are almost here! Both promotions begin on January 5th and you are going to love the new goodies featured in both! To tempt you, I created this whimsical card that would be perfect for Valentine's Day or anytime you want to express your love. The stamp set is a new one from the Occasions Mini called "I {Heart} Hearts." I love how one of the stamps includes three heart images that coordinate with the Heart to Heart punch! The border was created with a new punch that can be earned during Sale-a-Bration (for every $50 you spend, you can earn one free product).

Thanks for stopping by!

~~Marilyn~~

Stamps: I {Heart} Hearts
Cardstock: Melon Mambo, Soft Suede, Pretty in Pink, Whisper White
Ink: Melon Mambo, Soft Suede
Accessories: Heart to Heart punch, 1-3/4" circle punch, Scallop Trim Border punch, stampin' dimensionals

Friday, December 25, 2009

Season's Greetings!

Wishing everyone a very
Merry Christmas!

May you all enjoy time today with friends and family. Thank you for visiting my blog this year! I've really enjoyed sharing my various projects and appreciate when you take the time to leave me a comment. Reading those really make my day!!

I have one last Christmas project to share...


For these cards, I used the same colors with the same basic layout. I get tired of making too many of one card, so I like to change things up a bit. Hope you like them!

Thanks for stopping by!

~~Marilyn~~

Stamps: Berry Christmas, Dasher, Patterned Pines
Cardstock: Real Red, Garden Green, Very Vanilla
Ink: Real Red, Garden Green, Chocolate Chip, Close to Cocoa
Accessories: Merry Moments designer series paper, stampin' dimensionals

Wednesday, December 23, 2009

Retro snowflakes

After making a lot of Christmas cards with classic color combos, I wanted to make a few with a non-traditional twist. And I think this Melon Mambo, Tempting Turquoise and Basic Gray color combo does the trick nicely! It's a little hard to tell in the photo, but I used a spritz of shimmer mist to add a little pizzaz. Here's a close-up so you can see the subtle shimmer:


Thanks for stopping by!

~~Marilyn~~


Stamps: Patterned Pines, Christmas Punch, Berry Christmas, Christmas Greetings
Cardstock: Melon Mambo, Tempting Turquoise, Whisper White
Ink: Melon Mambo, Tempting Turquoise, Basic Gray
Accessories: Platinum Shimmer Mist, stampin' dimensionals

Monday, December 21, 2009

2010 Calendar


I've been busy mass-producing Christmas cards which is why I don't have much in the way of new projects to share, so I wanted to show you this awesome calendar made by a fellow demonstrator - Mary Knabe (sorry, she doesn't have a blog to direct you to!). She took the Delightful Dates Calendar Kit that's featured in the Holiday Mini Catalog and created this fabulous 2010 calendar using an altered canvas. When Mary showed us her creation, we were all oohing and aahing! Beautiful, isn't it??

Thanks for stopping by! I hope to have some new projects to share with you real soon.

~~Marilyn~~

Wednesday, December 16, 2009

Festival of Lights


Ok, so I may be a little late as Hanukkah is almost over, but here is this year's effort. I only have one Hanukkah stamp and GASP, it's not from Stampin' Up! I bought it years ago and love the intricate design. I stamped it with Versamark on Brushed Silver cardstock and then embossed with silver embossing powder. It's so elegant IRL! I don't think the picture does justice to the shimmery silver! I wanted the main panel to stand out against the dark cardbase so I sponged the edges to make it a shade darker than the cardstock.

Thanks for stopping by!!

~~Marilyn~~


Stamps: non-SU
Cardstock: Night of Navy, Basic Gray, Brushed Silver
Ink: Versamark, Night of Navy
Accessories: scallop trim edge punch, sponges, silver embossing powder, heat tool, stampin' dimensionals

Monday, December 14, 2009

Here Comes Rudolph!


Isn't this Rudolph box just the cutest thing ever?? At my upline's Christmas party, we made this adorable gift box without a single stamp! We used 3 dies with the Big Shot and some punches. Clever huh??

Thanks for stopping by!

~~Marilyn~~


Stamps: none
Cardstock: Close to Cocoa, Chocolate Chip, Whisper White, Basic Black
Ink: Close to Cocoa, Basic Black
Accessories: Big Shot, Top Note die, Decorative Accents die, Fancy Favor Bigz die, Old Olive grosgrain ribbon, large oval punch, 3/4" circle punch, white gel pen

Friday, December 11, 2009

New goodies!!


Just around the corner is Sale-a-Bration AND a new mini catalog! Starting January 5th, Stampin' Up! introduces lots of new goodies - stamps, designer series papers, punches and other accessories! I love that demonstrators get to pre-order goodies - just another benefit Stampin' Up! offers us! :-)

This card incorporates a new punch that is available through Sale-a-Bration and a new stamp set and embossing folder in the Occasions Mini Catalog. Oh, and exciting news about stamps in the mini catalog... Stampin' Up! is introducing their line of repositionable clear-mount stamps!!


Clear-Mount Rubber Stamp Features
  • Nine different sizes of clear blocks available individually or as a discounted bundle.
  • Blocks have ergonomic grooves on all four sides for easy grip and traditional wood-mount feel.
  • Stamps and blocks are durable and easy to clean with your Stampin' Scrub and Stampin' Mist.
  • Optional image labels on stamp backs let you decide if you want to see the image through the block or not.
  • Tight die-cutting for easy image positioning.
  • Large clear blocks can be used to create collages or spell words with alphabet sets.
  • Stamps store easily in standard, DVD-type cases with artwork on front and spine, making organization easy.
Just wait until you see ALL of the goodies available next month - your wish list is going to grow!

Stamps: Vintage Vogue
Cardstock: Melon Mambo, Crushed Curry, Very Vanilla
Ink: Melon Mambo, Crushed Curry
Accessories: Big Shot, Pretties kit, scallop trim edge punch, modern label punch, Perfect Polka Dot embossing folder, stampin' dimensionals

Tuesday, December 8, 2009

Stampin' Up!'s Giving Spirit

From its beginning, Stampin' Up! co-founder, Shelli Gardner, felt it was very important to make giving back a priority. And through the years Stampin' Up! has been involved in many worthwhile causes. In addition to being an international sponsor of the Ronald McDonald House Charities, Stampin' Up! has donated money to September 11, tsunami, and wildfire relief funds, as well as breast cancer research and heart health. Hundreds of thousands of dollars of discontinued product are donated to nonprofit organizations every year.

Last week, Shelli was asked to appear on the Today Show because of Stampin' Up!'s charitable giving including the show's Holiday Toy Drive. This year, Stampin' Up! is donating over $150,000 worth of stamping and paper crafting products to the following organizations:

  • Child S.H.A.R.E.
  • A Place Called Home
  • Alliance for Children's Rights
  • Children's Hospital
  • El Concilio Del Condado de Ventura
  • St. Joseph Center
  • Yolo Wayfarer Center Christian Mission
  • Metro Atlanta Task Force on the Homeless
  • ARC of Bergen and Passaic Counties
  • Women in Need
  • ARMS
  • Albuquerque Health Care for the Homeless
  • Housing Works
  • All Children's House Family Center
  • Cathedral Community Cares
  • Catholic Big Brothers and Sisters
  • Dominican Women's Development Center
  • Girls' Vacation Fund (Girls' Quest)
  • Partnership with Children
  • Project Sunshine
  • Little Flower Children's Services of New York
  • Domestic Violence Intervention Services
  • Texas Head Start Association
  • First Place School
  • Friendship Project
It's just nice to know that Stampin' Up! truly believes in doing the right thing for all the right reasons!

~~Marilyn~~

Monday, November 30, 2009

Cheerful Circles


I hope everyone had a wonderful Thanksgiving! We spent the holiday visiting my mom and stepdad in Chicago - lots of fabulous, yummy food and fun time with family!

With Christmas a mere 26 days away and as much as I love making Christmas cards, I just felt the urge to create something non-Christmas tonight. Looking for a way to use the Christmas Cocoa designer series paper in a non-traditional way, I paired it with Melon Mambo and Pumpkin Pie for a whimsical look! I wouldn't use this card for mass production, though, because of all the marker-ing on the Circle Circus image. The circle image lent itself perfectly with the jumbo grommets I had just waiting to be used!

I think this will be a very cheery card to send to a friend in need of some positive thoughts.

Hope you like it! Thanks for stopping by! :-)

~~Marilyn~~


Stamps: Circle Circus, Trendy Trees
Cardstock: Melon Mambo, Pumpkin Pie, Soft Suede, Whisper White
Ink: Melon Mambo, Pumpkin Pie, Soft Suede
Accessories: jumbo grommets, Big Shot, scallop square die, Christmas Cocoa designer series paper, corner rounder, stamp-a-ma-jig, stampin' dimensionals

Monday, November 23, 2009

Holiday swap


The group of local Stampin' Up! demonstrators I belong to had a holiday card swap this past weekend. I loved seeing all the wonderful Christmas card designs everyone came up with! This is my card featuring a super cute snowman from one of the hostess sets in the Holiday Mini Catalog. I was getting tired of using traditional green and red for my holiday cards, so I opted for a fresh color combo this time around. I used the Big Shot machine and an embossing folder to create lots of dimension on the panel of Ballet Blue behind the snowman. Hope you like it!

And be sure to check out the fabulous deals Stampin' Up! is offering this week through the Online Extravaganza. There are products and bundles at up to 50% off retail!!

Thanks for stopping by!

~~Marilyn~~

Stamps: Snow Buddies (hostess set), Christmas Greetings
Cardstock: Bashful Blue, Ballet Blue, Almost Amethyst, Watercolor Paper
Ink: Stazon Black, Bashful Blue, Almost Amethyst, Pumpkin Pie
Accessories: Big Shot machine, Finial Press embossing folder, stampin' dimensionals

Tuesday, November 17, 2009

Greetings from Dasher

Can you believe that it's only a little over 5 weeks until Christmas??! We've been having unseasonably warm weather here in southwest Ohio, but I'm lovin' it! I've started my Christmas shopping, have a good supply of Christmas cards already made, and am looking forward to spending Thanksgiving with my mom and stepdad next week!

So here's a simple card using the Christmas Cocoa designer series paper. I love this Real Red and Soft Suede color combo for holiday cards! Hope you like it!

Thanks for stopping by!

~~Marilyn~~

Stamps: Dasher,
Cardstock: Real Red, Soft Suede, Whisper White
Ink: Soft Suede
Accessories: Christmas Cocoa designer series paper, scallop oval punch, eyelet border punch, corner rounder, stampin' dimensionals

Monday, November 16, 2009

Repurposed


I still have some leftovers from a stamp-a-stack and am trying to find ways to re-purpose them. I created this cute card using Dusty Durango as the cardbase. I love mixing this color with Tempting Turquoise and Old Olive - a very fun, fresh color combo! I stamped the image with Stazon so that I could use an aquapainter to color it in. I just love a quick and easy card - this one took only about 5 minutes!

Thanks for stopping by!

~~Marilyn~~


Stamps: Very Thankful, Polka Dot background (retired)
Cardstock: Dusty Durango, Tempting Turquoise, Old Olive, Close to Cocoa, Whisper White
Ink: Dusty Durango, Stazon Black, Old Olive, Tempting Turquoise, Pretty in Pink
Accessories: wide oval punch, 1-3/4" circle punch, aquapainter, stampin' dimensionals

Sunday, November 15, 2009

Reverse Masking


I attended the Stampin' Up! Regional Conference back in September, and one of the techniques that Shelli Gardner herself showed us was a variation on masking. Usually to do masking, you stamp your image twice - once one cardstock and once onto scrap paper. Then you can cover the cardstock image with the scrap so when you stamp other images, they appear to be behind on the original image. It's great for creating dimension without any added bulk.

Well, this technique is called reverse masking. Instead of using the stamped image for masking, you use the negative space. First, I stamped the medallion with Versamark on Whisper White cardstock. I applied clear embossing powder and used the heat tool to set it. Then I stamped the Medallion image on scrap paper and cut it out. Using the reverse mask, I lined it up with the embossed image and applied inks to the image. The embossed area resists the ink and with the mask, you're left with a halo effect around the stamped image. It's so beautiful!

Thanks for stopping by!

~~Marilyn~~


Stamps: Medallion, Full of Life
Cardstock: So Saffron, Bermuda Bay, Whisper White
Ink: So Saffron, Certainly Celery, Bermuda Bay, Versamark
Accessories: clear embossing powder, heat tool, stampin' dimensionals

Wednesday, November 11, 2009

Give thanks


After discovering the fabulous herringbone technique, I knew my stamp club ladies would love it. After all, what self-respecting stamper doesn't look for every conceivable way to utilize the growing pile of scraps we seem to accumulate?? I tried several variations and ended up with this Thanksgiving Day card that is reminiscent of an old quilt. I love the Bella Bleu designer series paper for this technique - it has such a nice charming vibe. I have to say this is one of my favorite cards I've made in a long time!

Thanks for stopping by!


~~Marilyn~~


Stamps: Holiday Best
Cardstock: Sahara Sand, Not Quite Navy, Naturals Ivory
Ink: Not Quite Navy, Creamy Caramel
Accessories: Bella Bleu designer series paper, 1-3/4" circle punch, wide oval punch, stampin' dimensionals, Xyron

Salute to heroes


Thank you to all those who serve or have served our country! Wishing a safe return of all those serving overseas. Blessings to all of you brave men and women!!

Saturday, November 7, 2009

Digital Halloween


A nice quiet evening sitting on a wonderfully comfy couch, dogs curled up next to me, sipping a cherry limeade from Sonic (yum!!) and time to play around with My Digital Studio....what a perfect night! Here's a simple page I designed with some pictures from Halloween night. I love the ability to edit my photos in the program! I changed my mind several times about which pictures to use and how to crop them, and My Digital Studio makes that so easy!

Thanks for stopping by!

~~Marilyn~~

Friday, November 6, 2009

It's Snowing!


Are you ready for another holiday card?? This simple card uses only one sentiment stamp! I love how punched images can be used as a substitute for a stamped image. I punched out several snowflakes from Bashful Blue cardstock and attached them to Real Red textured cardstock, trimming the edges. The panel was mounted on Whisper White cardstock and attached to the cardbase with dimensionals. I wanted the sentiment to really stand out on the cardbase, so I used Versamark ink and white embossing powder.

I love how this one turned out. Real Red, Bashful Blue and Whisper White make one fabulous holiday card color combo! Thanks for stopping by :-)

~~Marilyn~~

Stamps: Four the Holidays
Cardstock: Real Red, Whisper White, Bashful Blue
Ink: Versamark
Accessories: white embossing powder, heat tool, snowflake punch, stampin' dimensionals

Thursday, November 5, 2009

Patterned Pine


My next few posts will be more holiday cards I created for a craft show. I wanted to use up some pieces of the Christmas Jingle Simply Scrappin' Kit I used for a class last month. By simply using some leftover pieces of adhesive diecut strips, I was able to create a nice framing for a stamped image. I used a marker to color in just one of the trees in the Patterned Pines hostess stamp set and used the Christmas sentiment from the always-useful Teeny Tiny Wishes stamp set. The panel was mounted onto the cardbase with a few stampin' dimensionals and that's it! Done!

Hope you like it! Thanks for stopping by :-)

A little sidenote: Did you notice my new blog header? I created it in My Digital Studio (MDS), Stampin' Up!'s new digital paper crafting software! I still have a lot to learn about of MDS, but boy am I having fun playing with it!!

~~Marilyn~~

Stamps: Patterned Pines (hostess Level 1), Teeny Tiny Wishes
Cardstock: Old Olive, Chocolate Chip, Whisper White
Ink: Old Olive, Real Red
Accessories: Christmas Jingle Simply Scrappin' Kit, stampin' dimensionals

Tuesday, November 3, 2009

Make merry!


I'm working on my inventory for a craft show I'm doing this weekend sponsored by the VFW Ladies Auxiliary in Mason, Ohio. I'm focusing my projects on stocking stuffers, teacher gifts, and other kinds of goodies along with holiday cards. This is a simple but elegant Christmas card using a traditional green and red color combo. I used the stamp-a-ma-jig to stamp the wreath image twice (overlapped) to provide more coverage. I ran a piece of Certainly Celery cardstock through the Big Shot with an embossing folder and adhered it to a Certainly Celery cardbase for some tone-on-tone depth. Another very clean and simple card, but the embossing and organza ribbon really cranks up the wow factor. :-)

Thanks for stopping by!

~~Marilyn~~


Stamps: Berry Christmas
Cardstock: Certainly Celery, Real Red, Whisper White
Ink: Certainly Celery, Real Red
Accessories: Big Shot, Finial Press embossing folder, modern label punch, stamp-a-ma-jig, Whisper White organza ribbon, stampin' dimensionals

Sunday, November 1, 2009

It's not too early to start!

Don't let the holidays sneak up on you this year. Stampin' Up! has pulled together some great gift-giving ideas for everyone on your list - kids, teens, scrapbookers, card makers, neighbors...

Download the Christmas Gift-Giving Guide here and make your holiday shopping easy. All products can be ordered on my website or by calling or emailing me.
And to sweeten the deal, Stampin' Up! is offering a FREE decor elements product (up to a $16.95 value) with every $50 purchase from the guide!

And if your Santa needs ideas for YOU, email me for your very own Dear Santa letter!

~~Marilyn~~

Wednesday, October 28, 2009

Experimenting with new technique

I found a fabulous technique called Herringbone that was featured on fellow Stampin' Up! demonstrator Dawn Olchefske's blog and couldn't wait to try it out! It's a great way to use up scraps of designer series paper. I used the Christmas Cocoa DSP from the Holiday Mini Catalog for the technique and LOVE how it turned out! This is definitely a technique I'll be using a lot!

Thanks for stopping by !

~~Marilyn~~


Stamps: Berry Christmas
Cardstock: Real Red, Soft Suede, Whisper White
Ink: Real Red, Soft Suede
Accessories: stamp-a-ma-jig, Christmas Cocoa designer series paper, sponges, wide oval punch, stampin' dimensionals

Tuesday, October 27, 2009

Personal challenge


I had some leftover pre-cut cardstock from a class I did last month, so I challenged myself to create something new using the same pieces. Another clean and simple design that helps to showcase this new Patterned Pine stamp set. While the original card was designed as a thank you card, I thought the colors translated perfectly into a Christmas card. If you find yourself with leftovers, I challenge you to try to re-purpose them into a new card!

I'd like to leave you with a fabulous fall photo I shot over the weekend in my backyard. I LOVE Autumn - it's hands-down my favorite season. Watching the leaves change color is such a wonderful reminder of the beauty of nature. This is one of our maple trees and I love its transitional colors.


Thanks for stopping by!

~~Marilyn~~


Stamps: Patterned Pines
Cardstock: Real Red, Summer Sun, Whisper White
Ink: Garden Green, Real Red
Accessories: red gingham ribbon, stampin' dimensionals

Monday, October 26, 2009

Last Deal of the Week

Today starts the last week of Stampin' Up!'s Deal of the Week. Until Saturday, you can purchase the following items at a discount:
  • Princess Party Kit (#116214), regularly $15.95, now only $9.99
  • Pirate Party Kit (#116213), regularly $15.95, now only $9.99
New in this year's Idea Book & Catalog, these kits include everything to create the perfect party for your princess or pirate! You receive supplies to create 8 invitations and a variety of party treats. To see the kit contents, refer to pages 174 and 175 in the catalog. Please note that assembly is required, and adhesive is not included.

You can place your order online at my website or you can call or email to place an order.


~~Marilyn~~

Saturday, October 24, 2009

Just the facts...

I'm back with another clean and simple design. I'm heading out to spend the day with my mother-in-law, so just the basics on this one. This gorgeous Bella Bleu designer series paper adds such elegance! I sponged the edges to soften it up a bit, mounted onto cardstock and then onto the cardbase with stampin' dimensionals. Then I added a little ribbon, a simple stamped image with a layer, again with some dimensionals. How simple is that??

Have a great day!

~~Marilyn~~


Stamps: Dreams du Jour
Cardstock: Kraft, Not Quite Navy, Very Vanilla
Ink: Not Quite Navy
Accessories: Bella Bleu designer series paper, Kraft taffeta ribbon, sponges, stampin' dimensionals

Monday, October 19, 2009

Deal of the Week!

This week's deals of the week include items that are perfect accessories to any card or scrapbooking project!

Mini Library Clips
(#109857) regularly $12.95 are only $8.99 this week! They include 48 pieces (12 of black, silver, antique brass, and pewter).

Basic Jumbo Grommets (#114348) regularly $6.95 are only $4.49 this week! They include 20 pieces (5 of Basic Black, Silver, Very Vanilla, and Whisper White).

1/2" Library Clips (#112581) regularly $6.95 are only $3.99 this week! They include 24 pieces (8 of Chocolate Chip, Old Olive and Whisper White).

Circle Designer Brads (#112571) regularly $5.95 are only $3.99 this week! They include 16 pieces (8 of 2 sizes).

Take advantage of this awesome sale and order these items directly through my Stampin' Up! website.

~~Marilyn~~

Sunday, October 18, 2009

Craft show preparations

I'm going to be at a craft show at the local American Legion Hall benefiting the VFW Women's Auxiliary on Saturday, November 7th and have been working on some of my projects. I've seen such cute punched creatures and adapted them for Christmas tags. And they can also double as a tree ornament. The first one is a version of a Christmas card I designed for a stamp camp.


Then I saw several cute penguins and had to try it out as well!

And finally a cute Rudolph! I embossed his nose to make it shiny (or is it "glow"?) and used the snowflake punch to create his antlers.


Craft shows are always trial-and-error as far as what projects sell. Even with the same event, it can change from year to year. And this is my first time at this particular craft show, so I'm trying to make a wide variety of projects and a wide variety of price-points. I guess I'll see how these go over! Keep your fingers crossed for me! :-)

Friday, October 16, 2009

My first MDS project!

What is MDS? Only Stampin' Up!'s fabulous new product, My Digital Studio! It's more than just for digital scrapbooking...it's for all kinds of digital paper crafting projects. My first project was a baby announcement, but you can use MDS to make scrapbook pages, cards (think of photo holiday cards!), customized stationery, calendars, blog headers (I'll be trying that out in the coming days!!), and so much more!

MDS gives you access to Stampin' Up! exclusive colors and images with the flexibility to customize them to your liking. For example, the text above and the flourish behind the text were both created using Chocolate Chip ink color, but I was able to reduce the opacity of the flourish so that it was more of a watermark. And I shrank down the flourish from its original size.

Once you've created your personalized project, Stampin' Up! offers printing services through a high-quality print facility that has machines calibrated to accurately print Stampin' Up!'s exclusive colors. This is a fabulous benefit if you want to create a "hybrid" project where you accessorize the digital project with 3-d elements (ribbon, buttons, etc.). Plus, it's delivered straight to your door. How easy is that??

If you'd like to get your own My Digital Studio, just visit my website and place your online order today!

~~Marilyn~~

Wednesday, October 14, 2009

Fun with shimmer paints!

Thank you to all you wonderful stampers who graced my family with so many prayers when my father-in-law passed away last week! I'm anxious to get back to stamping and blogging - 2 great escapes for me during all this stress. Hopefully you'll see more frequent posts!

My next round of stamp club started tonight with 7 repeat members and 2 new members (shout out to Barb and Stacy!). After seeing all the wonderful things you can do with the new shimmer paints at the demonstrator regional conference in Cincinnati last month, I knew it would be the perfect product to feature tonight! I showed 2 ways of using the paints: as a layer over a stamped image and as a shimmer mist.


The first card was Thanksgiving-themed and features the delicate new Autumn Splendor stamp set from the Holiday Mini Catalog. We stamped the leaf with Always Artichoke and then again with Champagne Mist shimmer paint (using a stamp-a-ma-jig for perfect placement). It's hard to tell in the picture, but the leaf is so beautifully shimmery!


The second card features shimmer mist. To create the mist, you combine Isopropyl Alcohol (I used 91%) and drops of Frost White shimmer paint. Mix it well and then spray your cardstock. We used a heat tool to speed up the drying process before embossing and punching. Oooh, what a gorgeous effect! Lots of shimmer but no mess like glitter can make!

I hope you like the projects as much as my stamp club members did! Thanks for stopping by!

~Marilyn~


{{thanksgiving}}
Stamps: Autumn Splendor, Falling Leaves
Cardstock: Always Artichoke, Soft Suede, Very Vanila
Ink: Soft Suede, Always Artichoke
Accessories: stamp-a-ma-jig, Champagne Mist shimmer paint, sponge dauber, Kraft taffeta ribbon, mini glue dots, sponges, stampin' dimensionals

{{christmas}}
Stamps: Berry Christmas
Cardstock: Garden Green, Real Red, Very Vanilla
Ink: Garden Green
Accessories: ornament punch, Big Shot, Finial Press embossing folder, Frost shimmer paint, stampin' dimensionals, heat tool, Isopropyl Alcohol

Tuesday, October 6, 2009

Taking a leave of absence

I will not be posting on my blog until next week. My dear father-in-law passed away yesterday and we're heading out of town for the rest of the week. I knew John for almost 20 years and he treated me as his own daughter, so it's like losing my own father, not just a father-in-law. It's been a rough year - he was diagnosed in February with lung cancer, fought it with chemo and test medication, went into remission, only to be plagued all summer by the devastation caused from his treatment. We watched him go from ICU to a specialty hospital to a nursing home back to the hospital into an extremely risky surgery back to ICU stepped down to a progressive care unit where he seemed to be holding his own. He finally took a turn Sunday night and was gone by the evening on Monday. He was a strong (and sometimes stubborn) man which is why he put up such a big fight battling everything thrown at him. It's a comfort to know that he's no longer in pain and in a better place. But for those of us left here without him, it's devastating. And my mother-in-law just lost her mother only a month ago. I can't imagine the sadness that she feels. If you're the praying type, please keep my family in your thoughts.

Last August, when John retired, he used part of his retirement package to take us all on a 12-day vacation through California, from San Francisco where we visited the military base he was stationed at as a young man and Muir Woods to visit his sister in Nipomo and then to Los Angeles where we treated my son to a day at Legoland and a day at Disneyland. Little did we know that would be the last trip we would take together. Here's a picture of him and my mother-in-law among the beautiful redwoods:


May you rest in peace John Granville Goodrich.

Monday, September 28, 2009

Birthday sparkle


Our life has been turned upside down again and again lately - my father-in-law had very risk emergency surgery Friday night so we were gone for the weekend again. Between the full-time working, homework duty in the evening, and all the family emergencies, stamping time has been very hard to come by. And when I do have a moment or two, I can't seem to get my groove going. *sigh*

But tonight I grabbed a few moments and was able to sit down and stamp something! Ah, that felt good! I made this quick birthday card with my favorite color combo - pink and brown. You probably can't tell in the photo, but I did some highlighting with dazzling diamonds to add a little sparkle. I thought the eyelet border punch played up the stamped image with the scallops and dots nicely!

Thanks for stopping by!!


Stamps: On a Pedestal, On Your Birthday
Cardstock: Pretty in Pink, Regal Rose, Close to Cocoa, Very Vanilla
Ink: Pretty in Pink, Regal Rose, Close to Cocoa, Summer Sun
Accessories: eyelet border punch, stamp-a-ma-jig, stampin' dimensionals, 2 way glue pen, dazzling diamonds glitter

Thursday, September 24, 2009

Regional Swaps

Thank you for continuing to visit my blog even though my posts have been very sparse lately! I started back to work full-time at the same time as my son's activities kicked into gear. In addition, I had 3 stamping events last week, so other than prepping for them, I haven't had a chance to stamp (criminal, I know!). So today, I'm going to share some wonderful creations by other demonstrators.

Earlier this month, I attended a regional seminar for Stampin' Up! demonstrators. Oh what fun! Imagine 500 stampers in one place, learning new techniques and business tips, stamping fun projects and swapping card samples! I only made 50 swaps this time around and was "swapped out" before the seminar even started!! I got so many wonderful cards, but there were a few that really made me stop and say "wow!" Here they are...


Isn't this color combination fabulous?!?!? This beauty was created by Lynne Aikins from West Leechburg, PA.

This one features the wonderful new shimmer paints from the Holiday Mini Catalog. This card is simple but sooooo elegant. It was designed by Joan Misner.

I love how this card features stamping on sheet music! How clever is that to recycle??? Sharon McNeely is the creator of this one.

And lastly, I just loved the monochromatic theme of this card. Debbie Prants created a very elegant and classy card!

I loved being surrounded by so much creativity! PLUS, I got to meet Shelli Gardner, Co-founder and CEO of Stampin' Up! What a thrill - she is such a geniune and caring woman and terrific role model!! The regional seminars are just one more fabulous benefit of being a Stampin' Up! demonstrator. Every once in a while, the seminars are opened up to non-demonstrators and two of my customers joined me for the fun. A shout-out to Shirley and Kay - hey ladies!!! :-)

Well, gotta run. I hope to be sharing some new projects with you real soon!

Thursday, September 17, 2009

Happy Birthday

to me! Wanna see what my wonderful husband and fabulous in-laws got me???


Oooh baby, I can't wait to play around with this beauty! And I got a fantastic photo backpack with all the bells and whistles! Lucky, lucky me!! :-)

Sorry for the lack of stamp posts - after last weekend's fundraiser craziness, I haven't had one moment to create. I started back full-time this week, my son started cub scouts and piano lessons again, I had stamp club last night and a class tomorrow and Sunday! I'm hoping to spend some time in my craft room this weekend so hopefully I'll have some new projects to share!

Thursday, September 10, 2009

Grateful


Here's a quick and easy card! The panel of Razzleberry Lemonade designer series paper was made using the Top Note die with the Big Shot. I ran it through once to create the usual top note. But then I turned it 90 degrees and ran it through again, this time resulting in a decorative square. (You could actually run it through a third time, this time turning it 45 degrees, if you wanted something more circular.) The color is very subtle but I stamped the Upsy Daisy image with Crushed Curry and then gently colored the flower tips with a Pumpkin Pie marker. I also used a scrap of the designer series paper to stamp the sentiment, which was punched out with the fabulous new modern label punch.

Just a note: I won't be posted again until next week...I have a crazy busy weekend in store! I'm heading to a Stampin' Up! regional conference in Cincinnati on Friday and the rest of my weekend is a big fundraiser (part of my day-job work!). So I'll see you next week! Thanks for stopping by!

Stamps: Upsy Daisy, Falling Leaves
Cardstock: Pumpkin Pie, Crushed Curry, Whisper White
Ink: Pumpkin Pie, Crushed Curry
Accessories: Razzleberry Lemonade designer series paper, Big Shot, Top Note die, modern label punch, stampin' dimensionals

Tuesday, September 8, 2009

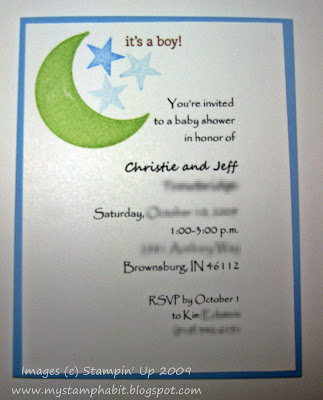
It's a boy!


No, I'm NOT pregnant! My sister-in-law's sister is expecting her first, and I was asked to design a simple invitation for her. She found out they are having a boy, so we worked out the color combo, I sent a few different ideas, and this is the one they decided on. I needed to finish them up so that I can get them shipped off tomorrow so I apologize for the poor photo. I sure hope she likes them!!


Stamps: Nursery Necessities
Cardstock: Bashful Blue, Whisper White
Ink: Bashful Blue, Certainly Celery, Close to Cocoa

Monday, September 7, 2009

More Christmas...

Yes, it's yet another Christmas card! And, oh how I wish, you could see this one IRL. I used some Brushed Gold cardstock, and it's so beautiful, but doesn't show up well in the photo. I really adds some sparkle and elegance to this simple card. I used some of the new Sleigh Bells cotton ribbon from the Holiday Mini Catalog (download it here) - love this stuff! In fact, there's a lot of stuff I love in the mini...glittered chipboard, ornament punch, fabulous designer series papers, digital scrapbooking, and much, much more! You've GOT to check it out!

Well, I'll try to stop with the Christmas projects for a while. Although it has been nice to get a jump start on my holiday cards...

Thanks for stopping by! :-)


Stamps: Lovely As a Tree
Cardstock: Old Olive, Brushed Gold, Real Red, Naturals Ivory
Ink: Old Olive
Accessories: color spritzer tool, jumbo eyelet, Crop-a-dile, Sleigh Bells ribbon, sponges, stampin' dimensionals

Sunday, September 6, 2009

Snowflakes


I just joined a great online group of Stampin' Up! fans called Stampin' Addicts. I took a look around and found their challenge section. Working off a sketch challenge from last week, I created this Christmas card using one of my favorite holiday card color combos. The colors look a little washed out in my photo, but the card is so vibrant IRL! The wide grosgrain ribbon makes it a little bulky for mailing, but would be perfect for a hand-delivered card. Hope you like it and thanks for stopping by! :-)


Stamps: Christmas Punch, Teeny Tiny Wishes
Cardstock: Real Red, Whisper White, Bashful Blue, Brilliant Blue
Ink: Brilliant Blue
Accessories: 1" circle punch, 1-1/4" circle punch, modern label punch, silver brad, Real Red grosgrain ribbon, Big Shot machine, Harlequin texturz plate, stampin' dimensionals

Thursday, September 3, 2009

Bright buttons


Last month I took advantage of the free button promotion and picked the Playground buttons - they are such fun colors!! I had a special celebration card to make (can't tell you who for until he/she gets in their hands!) and thought these would be perfect! I wanted something bright and fun and these buttons certainly fit the bill!


I hope the recipient likes it! :-)


Stamps: Starring You
Cardstock: Tempting Turquoise, Apricot Appeal, Old Olive, Real Red, Whisper White
Ink: Versamark
Accessories: white embossing powder, heat tool, Playground designer buttons, glue dots, 5-petal flower punch, scallop edge punch, sponges

Wednesday, September 2, 2009

It's Here!!!

It's that wonderful time of year when Stampin' Up! releases its Holiday Mini Catalog (download it here)! And wow, are you in for a treat with all the fabulous new products and hostess special!! :-)

New products:
  • Level 1 and Level 2 hostess sets
  • Big Shot dies
  • Halloween, Thanksgiving and Christmas stamp sets
  • designer series papers
  • glittered chipboard
  • ribbon
  • ornament punch (a must-have!)
  • rub-ons
  • shimmer paint
  • Simply Adorned line of customizable jewelry, (quality issues have prevented this from being available but hopefully soon!)
  • Build-a-Bear Workshop products
  • My Digital Studio, digital scrapbooking software with Stampin' Up! images and colors (available October 1st)
Hostess incentive: during September, October and November, with a $250 workshop, you can choose any item in the mini catalog (excluding hostess sets and My Digital Studio) for only $10 as part of your hostess benefits!

Don't say you weren't warned when your wish list explodes! ;-)

LinkWithin

Blog Widget by LinkWithin